Saturday, 30 June 2012

Railflyer Products Treadplate


The Railflyer products treadplate for my GP60 project arrived today, direct from Railflyer models in Canada.  

I have to admit I was pleasantly surprised, having read a number of complaints about their service on various forums, it was a bit of a last resort to order from them and I expected to be waiting a long time.  Instead, the order turned up very promptly, no longer than any other international order (in fact it was probably a bit quicker than Walthers!)

Needless to say I am now much more confident about placing future orders with them.


The treadplate is designed for the larger anticlimber that I am using on my models, and should be a direct fit.  I'm going to use this etched tread for the 'hero' GP60 and cut some Archers resin treadplate for the other locomotive.

The order also came with a postcard featuring sample swatches of the new Railflyer acrylic paint, I like the look of their Conrail blue so I may well give that a go when I do my next patched locomotive.

Rail Power for the Redbird?


While casting around for parts I picked up some more Rail Power Products shells on ebay recently and the first of them arrived this morning.  It's a Phase II GE C30-7 shell (Railpower part #60-501) designed to fit onto an Athearn u-boat chassis.


Mounting pin holes cast into walkway edge (lower left)

This shell dates from around 1989 and is one of the earliest models produced by the company, it is certainly on a par with the Athearn models of the day, although it does feature cast on mounting pin holes on the walkway sides to fit the Athearn frames, a feature that Athearn dropped after the SD40-2 in 1980. 

Other than some flash here and there, this is a pretty good basis for a 'four foot' model, but it may be a simple way to improve it for the N&W Redbird project. 

I have an Atlas B23-7 shell in the parts bin, so I'm thinking that with some careful cutting, it might be possible to assemble a composite model by splicing the Railpower hood inbetween the Atlas cab and radiator sections, the Atlas parts are modern and high detail, so the end result will probably look much more detailed than the Railpower shell on it's own.


Thursday, 28 June 2012

Home on the Range...


I picked up yet another geep for the Peoria layout.  This one is a Front Range GP9 in ATSF livery.  I will strip the shell and repaint as an N&W unit.


This locomotive was yet another ebay cheapie, and it needs some TLC to bring it back to life.  There are no number boards or lenses with it, and the front pilot has bent steps that will need attention.

This brings my total to three GP7/9's all of them needing repainted and DCC fitted.  Of course none of them are DCC ready, so there will be some fun and games to be had with the soldering iron.

I will probably paint and decal them all at the same time in a production line fashion, especially as they will all be similarly painted.


I also picked up a low-nose GP30 dummy which will be used as part of a multiple unit consist for the layout, although it is a P2K unit and I believe they can be a little tricky to strip.


I really need a high nose GP30, so I am on the lookout for one of those to partner with this one.  Hopefully one will pop up  on ebay soon.

Wednesday, 27 June 2012

Even more exact...


I received my second Exactrail box car today, it's a patched former Southern Pacific Hi-Cube boxcar from the Evolution series of models.


This boxcar is a superb model, the amount of detail is astonishing, right down to the walkways on each end and the very finely detailed underframe.

This one was a second-hand ebay purchase, the seller had mis-labelled the auction so I was able to pick it up very cheaply indeed, but now that I have two of these Exact Rail cars I'm starting to really notice the issues with my old blue box ones! 

I will need to see if I can rework a blue box to the standard of these ready-to-run ones!  That will be an interesting project!

I

Tuesday, 26 June 2012

Norfolk and Western Redbirds - Tuscan Locomotives

I recently picked up a copy of "Norfolk & Western in Color Volume 3" by Morning Sun Books, an excellent book which I hoped might provide some useful reference for my planned Peoria layout.


The book has hundreds of full colour images showing a wealth of details on N&W and Norfolk Southern locomotives and facilities.  Really a great read and I highly recommend it.  See here for more details:  http://www.morningsunbooks.com/southcat.html#nw_v3

Image from Norfolk & Western in color - Morning Sun Books

One of the interesting finds in the book was a series of pictures showing the Tuscan Red C30-7's and SD40-2 that were delivered to N&W in 1978/79.  These locomotives featured a metallic red pain scheme with gold lettering and they look very sharp indeed.


I've ordered a set of Microscale decals (Set HO110) which cover the required logos and numbers for all seven units that featured this scheme.


This should be a good project, although I am now on the lookout for a cheap C30-7 as a base unit for this project. There are several different versions available, including an old Railpower shell and versions by Atlas and Broadway Limited so I'm sure something will turn up sooner or later.

Monday, 25 June 2012

Freemo Module Update - Laying the turf

Good weather today so I was able to crack on with the scenery for my module, adding the first layers of grass onto the landscape.


The standard for our club modules is Woodland Scenics 'medium green' groundfoam, so I needed to keep my grass close to that colour, I used a mixture of different colours, but mostly the regular 'fine grass' and 'medium turf' types.


I had already laid a base layer of dirt across all the landscaped areas on the board, this was simply sieved garden dirt held in place with Woodland Scenics scenic cement.


I am using a 'wet on wet' method to layer the scenery, painting the base, then spraying scenic cement and sprinkling the dirt, then spraying again and adding the groundfoam and so on.

Spraying cement on Initial dirt layer.

Sprinkling fine grass layer as grass base.

Finished base grass layer.

More glue then adding layer of thicker 'turf' foam.

The rock castings were tinted with a wach of black acrylic, but on reviewing them I decided they were still too pale, so I added another thicker wash using grey acrylic to help darken the overall colour of the rocks.

Work in progress - Note the road areas masked off.

 The results are looking very good, and I'm very pleased with how the module is progressing.  There are only around ten weeks until the show, but I am confident I can get the scenery finished before then.

The next stage will be to finish building the scratchbuilt metal overbridge for the farm track and bedding it into the scenery.  The module will also need a fair number of trees, so I will investigating what is the best option for making/buying those.

Here are a few more pictures to show the results of the work so far.


Sunday, 24 June 2012

Thinning out the collection.


I've been avidly buying up locomotives for the past year and a half, and this weekend I did an inventory of the many (many, many, many) boxes piled up in my modeling space.  It was starting to look like that warehouse in Raiders of the Lost Ark!

I quickly decided it was time for a clearout.

I have a number of locomotives from 'other' roads including CSX, Chessie, Union Pacific, Canadian National, Santa Fe, Southern Pacific and a few others, which I purchased either because they were cheap, or because I planned to repaint them.

Most of them are modern locomotives (post nineties) and would not be suitable for my planned 1980's layout, and others are basket cases that simply need to be repaired and then sold on.

So I spent a few hours taking photographs this afternoon and listing them on ebay.  It's definitely against the grain for my 'hoarders instinct' but I reckon it makes sense to thin out the collection, not least of all so I can raise some funds to buy the new engines I need.

There are around a dozen assorted RTR SD50's, SD60's and SD70's to be listed, plus a whole load of spare bodyshells, random boxcars and other oddities.  So if you are on the lookout for a bargain then check out the buy-it-now section of ebay :)

In the meantime, I will keep hunting for cheap geeps...

Saturday, 16 June 2012

Norfolk Southern GP60 Project - Update

Its been a while since I updated on my Norfolk Southern GP60 project.  You can read my previous post here: LINK

Today I spent some time finishing a few smaller jobs on both engines, drilling the grabiron mounting holes for the Cannon nose and attaching the anticlimbers front and rear.

There is no commercially available treadplate for the GP60, and my original plan had been to adapt a Cannon Gp38-2 tread to match, however the differences in the step edges made me rethink that plan - there was simply too much of a difference between the shapes to make it work.

I followed up a suggesiton on the Diesel Detailer board and investigated Railflyer Prototypes. They have a set designed for the GP50 which should be a close match for what I need, a little pricey at almost $20 per set, but I have ordered one to give it a go.

Unfortunately there is only one UK supplier for Railflyer, the Scottish model shop Macs Models, and he was out of stock of the particular set I wanted, so I had to go with a direct order from the US.


In the meantime, I am going to try using an Archers resin treadplate decal to make the tread for one of the models.  The tread is similar to a waterslide decal and is applied to the model just before the final paint.

This shot shows the nasty seam along the front edge of the Railpower shell, these old moulds seem to give a 'soft' edge to the details, far different from the crispness of a modern model.  Most likely this is due to the type of plastic used to make them.  The seam will show through if I use the Archers treadplate, so I decided to try and use some ultrathin plasticard to cover the tread area.


After a lot of trial and error, I managed to cut a piece of 0.13mm styrene sheet to match the shape of the tread area on the front of the locomotive.


This shot shows the styrene in place, it nicely covers the gap in the decking and should make fitting the resin treadplate a lot easier.  The styrene is only 0.1mm thick, so if the Railflyer decking does fit, then I can simply glue it on top without affecting the look of the model.

Here is a shot of both engines with their decking sheets fitted.  The rear engine is using the slavaged SD50 cab, and it is intended to be a 'consist' engine rather than a showcase one.  That model will use the resin treadplate to keep the build costs down.


The rear of each engine features a handbrake recess.  The Railpower kit for a spartan GP60 comes with a blanking plate for the hole, but because both of my base units are GP60M's I needed to cut and fit a small piece of styrene to fill the gap.


My original plan was to fit a Cannon blower duct, but I turned out that the Railpower shell does not have enough space to fit one, there isn't enough height under the inertial filter grille.  So I opted to simply use the Railpower duct and fit the Cannon walkway tread and base around that.  It won't be as nice as the Cannon part, but it should be okay once it's painted.

Next step will be to drill and fit the remaining detail parts, the rooftop lifting hooks, and the radiator fans.

Tuesday, 12 June 2012

Kato Geep - another ebay cheapie


I picked up another older Kato, this one is a GP7 that was marketed by Atlas in the late eighties.  It's unboxed but in good condition, the previous owner has applied some weathering using chalks or powders, but it seems like that will rub off without any problems.


I'm loving the weight of this unit, it's got a solid metal frame, and the body detail is very nice, apart from the moulded on grab-irons. It's a shame that Kato didn't take a leaf from Athearns book and only mould in the location dimples.


The walkways include tread detail on the lower edges, and the plastic handrails are not too oversized, looking more or less the same as a modern Kato unit in thickness.

I will be repainting this model along with my brass geep, both of them becoming locomotives for my planned Peoria layout.

Monday, 11 June 2012

Freemo Board Update - Groundcover Begins

The summer weather seems to have departed for the time being, but I did manage to get a dry day over the weekend and began adding the ground cover to the board.


This first stage is the basecoat, for which I used dry dirt from the garden, sieved to remove the larger pieces.  I'm still unsure about how fine the dirt is, even once sieved it goes on a little large, although it will be ok once under the ground foam.


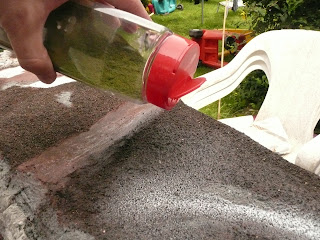
I worked in small sections, spraying the board with Woodland Scenics 'scenic cement' and then sprinkling on the dirt with my fingers, it took a couple of applications to get each area covered.


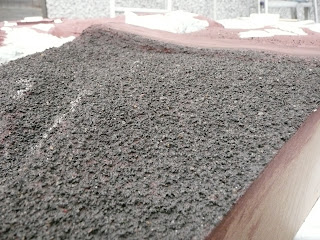
This view shows the finished effect, it's a little like a lava-field at the moment, but almost all of this will be covered with ground foam, the dirt is only there to provide a base layer.


I reckon I will need to invest in a finer sieve to get some really thin dirt for the open areas and the farm track.  I think an old tea strainer will probably be closer to the size I need.