Saturday, 31 December 2011

Freemo Module Update - Bridge Issues


I took my completed gunderson stack cars over to the clubhouse to try them out, and discovered that my measuring for the bridge height on my freemo module was a little off.  I'm using 2 inch insulation foam for the landscape, and that puts my road surface with another 1.5 inches height difference needed to clear doublestack cars.


I'd suspected that I might not have enough height for the bridge to clear doublestacks, but as I planned to model an arched bridge I hoped that there would be enough distance to get the extra 1.5 inch height difference without needing to raise the road level.  Sadly there wasn't.


I've added extra 'ramps' onto either side of the bridge road to help give extra clearance to the taller trains.


This is the bridge I am planning to build for my module, it's based on a prototype on Elkton Rd in Virginia, and has a really interesting metal frame with wooden road surface.  I will need to make my version slightly more extreme to clear the trains.

Friday, 30 December 2011

Gunderson doublestack repair project.

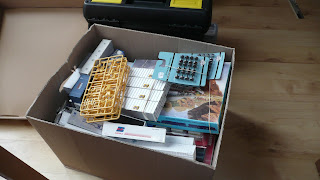
I've collected several different sets of doublestack container cars over the past year, along with various different brands of containers, most of which have been languishing in an A4 file box in the loft.


Most of the cars have been bought secondhand, and many of them are damaged or missing parts.  Today I began the process of sorting out the various parts and repairing the cars ready for use.  I had three five-car sets of Athearn Gunderson well cars (although one set is missing a car).


This first set was a bring-and-buy bargain from the NMRA Bournemouth Belle convention back in October.  I picked them up for only £8, a great price although most of the detail parts are broken.


The other two sets were a job-lot on ebay, although one of the intermediate cars is missing and - again - most of the detail parts have snapped off and one of the trucks was sheared off, these cars came with a selection of containers and were a very cheap set because of the damage.


I had invested in six sets of these replacement parts on ebay a few weeks ago, although in hindsight I should probably have bought a few more as I used up all the handrail pieces refurbishing the three sets of cars.


I also picked up some replacement wheels, a couple of sets of Proto 2000 and a set of Intermountain wheels.  These all-metal wheels are much better quality than the plastic sets that came with the cars.


This image shows the typical damage that the cars had sustained over the years, most of them had broken steps or partially missing handrails, brake-wheels and other details.

The work to repair the cars is fairly straight-forward, beginning with the removal of the broken steps.  The steps are located using holes pre-drilled in the car sides, and spigots on the underside of the end cars.


I used a craft knife and a chisel to carve off any remaining glue or plastic on the underside of the platforms.


The holes for the side ladders were blocked with glue or broken spigots on most of the cars, so a quick twist with a small jewellers screwdriver soon cleared them ready for the new steps to be attached.


I also used the jewellers screwdriver to push out the broken pins from the missing brakewheels, clearing the mounting holes for the replacement parts.


The wheels were replaced on all the cars, with both the Proto 2000 and Intermountain wheels proving to be an easy swap.  The image above shows the new wheels on the lower car and the old rusty athearn wheels on the upper car.


The Athearn kit uses three different sizes of screw, and using the wrong size can result in damage to the spigot that joins each car to it's neighbour.  The picture above shows one of the spigots before I replaced the mount section.  The light coloured plastic around the base of the spigot is a stress fracture caused by the previous owner of the cars assembling the truck with one of the longer screws instead of the short screws provided by Athearn.


With all the parts replaced, the cars are once again fully-detailed and ready to enter service.  I've also been collecting suitable shipping containers whenever I saw a job lot or cheap 'buy it now' on ebay, so I've been able to add loads to most of the cars.

I used a combination of Athearn, Walthers and another unidentified brand.  Unfortunately they are not inter-compatible so I had to redrill the mounting holes on some of the brands to get them to play nicely together.  The cars are secured using small blobs of CA as I don't intend to remove them.

When I examined some of the containers I had in my parts box were older designs or slightly different sizes, so I opted to leave them for another project.  That means I will need to invest in a few more containers to fill the rest of the cars.


After a couple of hours work, I have a fourteen car Gunderson train ready to take to the rails.  These were only a few of the cars I have in my intermodal crate, there are still about another six stand-alone well cars and two five-car Maersk sets to be worked on.  The Maersk sets will be used to recreate the promotional Maersk train from the early 90's and will need Maersk containers.

I'm going to add weathering to these sets in the spring, when the outside temperature is a little more friendly for airbrushing.  I really must look into getting a spraybooth one of these days!

I've also got some unpainted Athearn gunderson cars which I plan to paint at some point, one of them will be used to fill out the four-car set seen in these pictures.

Thursday, 29 December 2011

Building Project #1 - Roberts Dry Goods

Today I started building my first structure kit in twenty years.  This is a Design Preservation Models kit #10200 - Roberts Dry Goods.

This is also my first time building a DPM kit, because when I was modelling US outline back in the late eighties there was nowhere in the UK to buy these kits from, I had to make do with enviously looking at the pictures and reviews in Model Railroader magazine.


I bought this kit from LSWR Penguin at a show a few months ago and it has been sitting on the 'to do' list ever since.  For a while I had it taped together and placed on my freemo baseboard to check the size of space I need for the town section on my board.  I will have five buildings in the completed town - a mixture of DPM and RIX kits.


The kit is moulded in large, simple sections with doors and windows as one-piece.  The components are plastic and the kit includes a piece of plasticard to make the roof and some clear plastic for glazing.


The kit has a fair amount of flash and moulding tabs that need to be cut off before assembly.


The window edges need to be carefully trimmed to remove flash otherwise the uneven edges will show up when the details are painted.


The edges of the walls are not square, so some sanding is required to make sure that everything joins together without gaps.  I have ordered a Northwest Short Lines 'True Sander' which will make this job easier, but in the meatime I used the edge of a wooden box as a makeshift square edge.  A few seconds of sanding and the walls are square enough to assemble.


I added strips of square profile evergreen styrene to reinforce the corner joints, and I used a metal square edge to keep everything straight while assemblinf the walls.


The kit goes together very quickly and after a short while the main structure is complete.  The outer walls meet with only a thin edge to show where the flat edge of the wall is glued together.  I expect some careful scribing will help to make the join invisible.


The final step is to assemble the three sections that make up the front entrance to the store.  These require a little extra sanding to make sure they are true, then they glue together as a sub-assembly before attaching to the front of the store.


With the walls completed, the next step will be to add the roof and prepare the building for painting.

BNSF SD60M Update - The shell is replaced.


Here's a quick update on the damaged Athearn Genesis SD60M I recieved last week.  The BNSF shell is a write-off so it has gone into the parts box, luckily I had a spare Union Pacific SD60M shell which I bought cheaply on ebay a few months ago, so I have been able to use it to get the damaged engine back into use.

I don't model Union Pacific, but it makes for a pretty good looking locomotive, even if the silver sideframes are not correct :)

At some point I will either strip the shell and repaint for Norfolk Southern or paint the sideframes grey and sell the engine on.

Norfolk Southern GP60 Project - Converting a pair of GP60M's

Here's an update on my next project.  A pair of Norfolk Southern GP60's  These will be converted from Athearn/Railpower GP60M's and detailed as Norfolk Southern #7121 & #7129.

Here's a picture of the prototypes:


Here are the base models:


 A basket case Athearn GP60M I purchased very cheaply on ebay, the engine has suffered some collision damage, the truck sideframes are gone and the cab is loose.  Because of the damage I was able to pick it up very cheaply.


The second locomotive will be based on a 'new old stock' Railpower Products GP60M shell and chassis kit I bought from MG Sharp models (one of the few UK suppliers for RPP).

The Athearn is a reissue of the old RPP shell, so both of these locomotives will have the same heritage.

I will be stripping the Athearn shell and ditching the cabs (if anyone needs a couple of GP60M cabs then I'm open to offers). :)

I've already purchased most of the parts I need for these builds, including the correct truck sideframes and various Details West and Detail Associates parts.

One of the pair will be built with a salvaged Athearn SD50 cab, the other will use a Cannon cab.
I will update on progress as these builds get underway.

Saturday, 24 December 2011

Return to sender?

My most recent ebay bargain turned up in the post this week, or rather it turned up in pieces.


This was an Athearn Genesis SD60M in BNSF livery, which I picked up very cheaply as it had some handrail damage.  That shouldn't have been a problem because I have several replacement SD60 handrails in my parts box.

Unfortunately although the seller had very carefully packaged the Athearn box in a larger outer shipping carton with plenty of polystyrene beads, he hadn't actually secured the locomotive within it's own box.  The SD60M was originally supplied in packaging which includes a block of wood which the locomotive is screwed onto.  Unless it is screwed back onto the block of wood the locomotive will move around in the box (I found that out the hard way with my Norfolk Southern SD60M which suffered bent handrails in storage).

So this particular BNSF SD60M was loose inside the packaging, sliding back and forth, and obviously encountered some rough handing in the postal system too... it was not a pretty sight when I opened the package to find all manner of broken and loose parts rattling around.

The shell is really badly scratched and most of the detail parts have been snapped off, including the ditch lights (which were actually embedded in the box insert - suggesting a very heavy impact indeed)  the brass horn is bent and snapped, the plow is crushed and broken, the handrails are destroyed, the paint is scraped and even the couplers are snapped.

A real mess, and very dissapointing, especially as the post office hit me with a £12 fee for vat on top of everything.

Fortunately the seller was willing to give me a partial refund, so the outcome was not as bad as it might have been, but this locomotive goes on the rebuild backlog instead of into service.  I do have a Union Pacific SD60M shell in the parts box, so I may simply fit that for now.

The remains of the BNSF shell will go towards my parts collection as I don't think this shell is really going to be salvageable.

Sunday, 11 December 2011

A couple of weeks ago I took the train up to the Birmingham NEC to attend the Warely National Model Railway Exhibition, a massive two day event attended by over 16,000 hobbyists.

Rather than drive all the way up to Birmingham, I opted to take the Virgin train service from Watford Junction, and I was very impressed with just how smooth the trip turned out to be.  The NEC is located adjacent to Birmingham International Station, so I was in line for the opening of the doors at 9.30am.

The exhibition hall was huge, which was just as well because the crowds were equally large!  I haven't been to such a well attended railway show since the old Glasgow SEC shows in the late eighties.

The majority of the layouts and traders were british outline, with a large Hornby presence, but there were several US traders including Penguin, Macs Models and Signal Box.

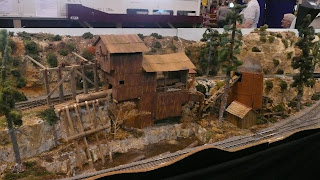
Layouts included several beautifully detailed switching layouts, a number of logging type layouts and even some LGB garden scale equipment.

I enjoyed the show, and picked up several bargains from the Signal Box, but sadly Penguin didn't have anything I needed as none of his stock was NS or CSX, and Macs Models were charging crazy prices (£35 for an autorack? - same model £15 at Signal Box!).

I'm already planning to attend the next Scottish SEC show early next year, should be fun.


Horse Creek - Wyoming - HO Scale


Large Scale Display - LGB Scale


Haven Hill Junction - On30 Scale


Menasha WI - Wakefield - HO Scale


Cushman Oregon - S-Scale


Purgatory Peak - On30


Wild Creek Lumber - OnG Scale


The Shop - Ronald Halma - HO Scale


Cornfield Yard - Ronald Halma - HO Scale


Jacksonville Yard - HO Scale - Terry Tasker


Bachmann Display


Atlas Display