Another ebay buy-it-now bargain, this as-new Kato C44-9W, fully boxed and barely used. Perfect as a companion locomotive for the basket case I picked up at last years NMRA convention. I just need to get the basket case fixed up!
This one will need a decoder before it can hit the rails, but other than that it's good to go. I love the running qualities of these Japanese locomotives and they'll look good double-heading a unit coal train around the club modules.
The main issue with the model is the ditch lights, the Kato dash 9's are based on the original Santa Fe units so they have low mounted ditch lights which are wrong for Norfolk Southern, and there are a few other discrepancies around the trucks and side panels, but considering how good they are otherwise, I'm happy to have them on my roster.
Showing posts with label Norfolk Southern. Show all posts
Saturday, 23 February 2013
Tuesday, 17 July 2012
Genesis Geep Rebuild
This week I picked up an Athearn Genesis GP15 on ebay, it was in pieces so I won it for £35 which seemed like a reasonable price provided I could get it back together.
It turned up today and sure enough, the model was in a very sorry state, with a large collection of loose pieces rattling around in the box.
It appears to be brand new, the wheels show little sign of wear, suggesting the previous owner had taken it apart to fit a DCC chip and then started losing parts, no doubt getting ever more frustrated as the model continued to shed parts until finally giving up in frustration and sending it to ebay.
I have to say the construction for these Genesis models leaves more than a little to be desired, it seems like most of the parts are push-fit, with tiny details like the frame bell, tank piping and radiator grilles coming loose at the slightest touch.
The first order of business was a test run, which revealed that the engine wasn't moving at all, this turned out to be down to the 8-pin dummy plug being loose and once it was pushed home the locomotive proved to be a very, very smooth runner indeed.
I fitted a Digitrax DH123 decoder and then assembled the locomotive and replaced the various loose parts, there didn't seem to be any missing pieces, so the end result looks very impressive.
The only real damage to the model are the usual handrail problems (one of the supports is broken) and there is a small hole drilled into the blower duct. This is a strange bit of damage , and it appears to be cause by the body mounting screws being accidentally pushed through the shell, or possibly the original owner attempting to drill out the chassis screw from the top. A bit of putty and some black paint should fix the hole.
So I'm very pleased with this one, it comes fully boxed and it proved to be a very quick job to get it back on the rails, with these models retailing for £88 currently, that means I got it for well under half price.
It turned up today and sure enough, the model was in a very sorry state, with a large collection of loose pieces rattling around in the box.
It appears to be brand new, the wheels show little sign of wear, suggesting the previous owner had taken it apart to fit a DCC chip and then started losing parts, no doubt getting ever more frustrated as the model continued to shed parts until finally giving up in frustration and sending it to ebay.
I have to say the construction for these Genesis models leaves more than a little to be desired, it seems like most of the parts are push-fit, with tiny details like the frame bell, tank piping and radiator grilles coming loose at the slightest touch.
The first order of business was a test run, which revealed that the engine wasn't moving at all, this turned out to be down to the 8-pin dummy plug being loose and once it was pushed home the locomotive proved to be a very, very smooth runner indeed.
I fitted a Digitrax DH123 decoder and then assembled the locomotive and replaced the various loose parts, there didn't seem to be any missing pieces, so the end result looks very impressive.
Damage to blower duct - (small hole at the walkway edge)
The only real damage to the model are the usual handrail problems (one of the supports is broken) and there is a small hole drilled into the blower duct. This is a strange bit of damage , and it appears to be cause by the body mounting screws being accidentally pushed through the shell, or possibly the original owner attempting to drill out the chassis screw from the top. A bit of putty and some black paint should fix the hole.
So I'm very pleased with this one, it comes fully boxed and it proved to be a very quick job to get it back on the rails, with these models retailing for £88 currently, that means I got it for well under half price.
Saturday, 21 April 2012
Twin Genesis Units
My latest purchases arrived this week, a pair of brand new Athearn Genesis SD70M-2 locomotives in Norfolk Southern livery.
These engines are the very latest released by Athearn and I've been waiting for almost a year since pre-ordering them. I opted to buy one with sound and one without, as I expect to be running them as a pair so having two sound units in the same consist seems like overdoing it.
As usual with Athearn, the detail on these models is outstanding, with every imagineable detail factory fitted. There is a small bag containing the truck sideframe cables, but otherwise these units are good to go straight out of the box.
Truly fantastic models and I'm really looking forward to getting them onto the test track to get them run in.
I will try to do an in-depth review of these new models shortly.
Friday, 6 April 2012
Modelling the Peoria local
As my collection of locomotives and rolling stock continues to grow, I've been planning to build a home layout.
With that in mind, I've been hunting for a suitable prototype railroad to use as inspiration, and I had considered modelling the Detroit Connecting Railroad as a switching layout, but the lack of large engines was a drawback (the DCR only uses GE 44 Ton centercab engines).
I recently picked up a job lot of old modelling magazines, including several issues of Prototype Modeler Magazine. One of these featured an in-depth article on the Gibson - Peoria local line through Goodfield and Bloomington in the late eighties.
I was intrigued by the cover photograph which shows a high nose GP9 leading a train across the Mackinaw river.
The line is still in use today and some views have not changed much as this recent photograph by Flickr user McKayak shows:
The line served several different industries, including the Caterpillar plant at Morton and various lumber mills, grain elevators and also the Nissan car plant at Diamond Star motors.
This recent shot of the Midwest Paper plant shows the opportunities for small industrial switching, the plant hasn't changed much if at all since the eighties.
Passing through Bloomington the line has a great 'downtown' feel, and I will definitely be aiming to capture the feel of the above photograph.
The line also featured a diverse range of motive power during the late eighties, including Delaware & Hudson engines, Southern GE engines and the regular Norfolk & Western and Norfolk Southern power.
So this line is a really great source of inspiration for a layout, and the time period of the late eighties is of interest not only for the variety of motive power, but also the fact that it fits my own personal modelling history as it was the same time that I first became interested in modelling US railroads.
You can read the article I was inspired by on this link, its from the July/August 1988 issue of Prototype Modeler magazine which covered the route in detail. Read the article here.
With that in mind, I've been hunting for a suitable prototype railroad to use as inspiration, and I had considered modelling the Detroit Connecting Railroad as a switching layout, but the lack of large engines was a drawback (the DCR only uses GE 44 Ton centercab engines).
I recently picked up a job lot of old modelling magazines, including several issues of Prototype Modeler Magazine. One of these featured an in-depth article on the Gibson - Peoria local line through Goodfield and Bloomington in the late eighties.
I was intrigued by the cover photograph which shows a high nose GP9 leading a train across the Mackinaw river.
Photograph by McKayak on Flickr - http://www.flickr.com/photos/22800108@N06/
The line served several different industries, including the Caterpillar plant at Morton and various lumber mills, grain elevators and also the Nissan car plant at Diamond Star motors.
This recent shot of the Midwest Paper plant shows the opportunities for small industrial switching, the plant hasn't changed much if at all since the eighties.
Passing through Bloomington the line has a great 'downtown' feel, and I will definitely be aiming to capture the feel of the above photograph.
The line also featured a diverse range of motive power during the late eighties, including Delaware & Hudson engines, Southern GE engines and the regular Norfolk & Western and Norfolk Southern power.
So this line is a really great source of inspiration for a layout, and the time period of the late eighties is of interest not only for the variety of motive power, but also the fact that it fits my own personal modelling history as it was the same time that I first became interested in modelling US railroads.
You can read the article I was inspired by on this link, its from the July/August 1988 issue of Prototype Modeler magazine which covered the route in detail. Read the article here.
Monday, 5 March 2012
Norfolk Southern GP60 Project - NS #7121 Cab
Work continues on my GP60 project locomotives (see HERE for details)
This is the locomotive that utilises a new-old-stock Railpower shell, I am building this one with all Cannon & Co. parts while #7129 has a combination of Cannon and salvaged Athearn parts.
The cab itself is a similarly detailed kit, and goes together very easily, although unfortunately I realised after I'd finished that I had read some advice which suggested leaving the roof off until after assembly, to make it easier to add the glazing.
The nose features the correct GP60 brakewheel side section and the toilet hatch, exactly as per the real locomotive.
This is the locomotive that utilises a new-old-stock Railpower shell, I am building this one with all Cannon & Co. parts while #7129 has a combination of Cannon and salvaged Athearn parts.
This is my first time using Cannon cab components, and I'm very impressed with the quality and variety of options these kits allow.
The sub base is built based on the precise details of the prototype locomotive, an easy job given the sheer number of options Cannon provide in their excellent kit.
The cab itself is a similarly detailed kit, and goes together very easily, although unfortunately I realised after I'd finished that I had read some advice which suggested leaving the roof off until after assembly, to make it easier to add the glazing.
The nose features the correct GP60 brakewheel side section and the toilet hatch, exactly as per the real locomotive.
Here is a photograph showing everything test fitted, the anticlimber and sub-base have been glued in place.
I had bought a set of Cannon GP tread-plates for the model, but the step shape is different from the older GP38-2 so I am going to have to rethink my approach to the tread for these locomotives.
Here's a shot of both models showing the progress so far.
Sunday, 26 February 2012
Norfolk Big Mac
Following my Kato SD90 purchase, I have just recieved a Kato SD80mac in Norfolk Southern livery. This model is from the last production run three or four years ago, but it has not been run and is in mint condition.
These 80ft long locomotives are probably my favourite modern engine, and it's great to finally have one in Norfolk livery.
This model will be lightly weathered and then run in tandem with the SD90 once I have changed the shell to make it a Conrail livery unit, then these models will be heading up a train of Walthers Bethgon goal gondolas.
Like the SD90 (which uses most of the same components) this Kato model is superb quality, with crisp detailing and finely printed livery, the plastic grabirons and handrails are more sturdy on these models than the celcon rails used by other brands, but they are also slightly thicker as a result.
It's hard to say which is better, but one good thing about these thicker handrails is that they don't bend or buckle like the Athearn Genesis rails.
I have been collecting the various parts needed to put together a Railpower Products SD90 and convert it into another SD80, although this project will be a longer term one, following my current RPP/Athearn GP60 conversions.
These 80ft long locomotives are probably my favourite modern engine, and it's great to finally have one in Norfolk livery.
This model will be lightly weathered and then run in tandem with the SD90 once I have changed the shell to make it a Conrail livery unit, then these models will be heading up a train of Walthers Bethgon goal gondolas.
Like the SD90 (which uses most of the same components) this Kato model is superb quality, with crisp detailing and finely printed livery, the plastic grabirons and handrails are more sturdy on these models than the celcon rails used by other brands, but they are also slightly thicker as a result.
It's hard to say which is better, but one good thing about these thicker handrails is that they don't bend or buckle like the Athearn Genesis rails.
I have been collecting the various parts needed to put together a Railpower Products SD90 and convert it into another SD80, although this project will be a longer term one, following my current RPP/Athearn GP60 conversions.
Friday, 13 January 2012
Like a bridge over troubled module...
I spent some time working on my freemo module over at the club space tonight. I had three work-in-progress buildings with me to double check the spacing and layout of the town at one end.
I had laid out the building locations using paper templates, cut to measurements from the Walthers catalogue, and for the most part that seemed to have worked well. The two rix bungalows turned out to need more space than I had allowed, mainly because I chose to use the version of the kit that includes a brick porch.
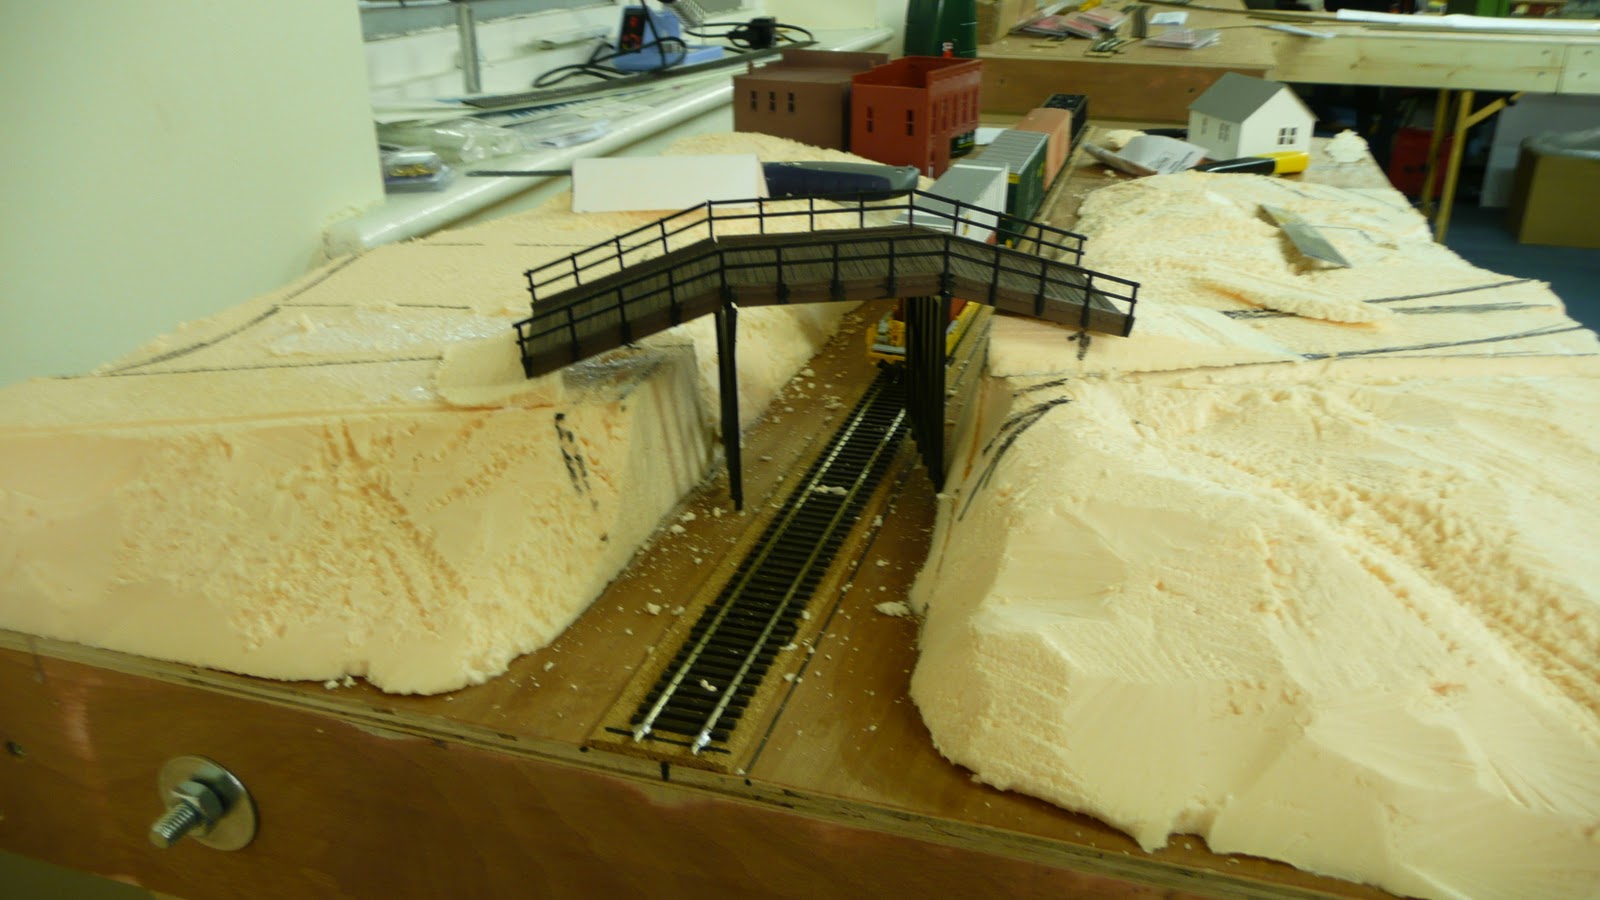
I realigned the road slightly at one end, and using a Rix wooden overpass kit that one of the other members has built for another module, I was able to previsualise the size and shape of bridge I will be adding to my module.
I had already added ramps to either side of the gap to build up the road surface to a more 'double stack friendly' height, but once I saw the Rix kit in place it was obvious that I didn't need as much space as I had thought, so I was able to remove one of the added pieces and replace it with a much smaller ramp.
I will be cutting back the edges of the embankments on either side of the bridge to give a shallower angled slope, which will make the trackside area much more realistic. The bridge itself will be a scratchbuilt structure based on a Norfolk Southern prototype in Virginia.
I had laid out the building locations using paper templates, cut to measurements from the Walthers catalogue, and for the most part that seemed to have worked well. The two rix bungalows turned out to need more space than I had allowed, mainly because I chose to use the version of the kit that includes a brick porch.
I realigned the road slightly at one end, and using a Rix wooden overpass kit that one of the other members has built for another module, I was able to previsualise the size and shape of bridge I will be adding to my module.
I had already added ramps to either side of the gap to build up the road surface to a more 'double stack friendly' height, but once I saw the Rix kit in place it was obvious that I didn't need as much space as I had thought, so I was able to remove one of the added pieces and replace it with a much smaller ramp.
I will be cutting back the edges of the embankments on either side of the bridge to give a shallower angled slope, which will make the trackside area much more realistic. The bridge itself will be a scratchbuilt structure based on a Norfolk Southern prototype in Virginia.
Thursday, 5 January 2012
Dashing through the Christmas post...
My newest engine arrived this morning, after languishing in a delivery office somewhere for the festive season.
It's an Atlas master series Dash 8-40C spartan cab in Norfolk Southern livery, my second of the superb Atlas GE units and just as detailed as the Conrail 8-40B I bought last year.
As you can see from the photos below, the amount of detail on these Atlas units is incredible, with truck air hoses, sanding lines, chains, grab irons, etched grilles... the list goes on and on. Other than an airconditioner it's hard to see what would need to be added to the model.
Saturday, 31 December 2011
Freemo Module Update - Bridge Issues
I took my completed gunderson stack cars over to the clubhouse to try them out, and discovered that my measuring for the bridge height on my freemo module was a little off. I'm using 2 inch insulation foam for the landscape, and that puts my road surface with another 1.5 inches height difference needed to clear doublestack cars.
I'd suspected that I might not have enough height for the bridge to clear doublestacks, but as I planned to model an arched bridge I hoped that there would be enough distance to get the extra 1.5 inch height difference without needing to raise the road level. Sadly there wasn't.
I've added extra 'ramps' onto either side of the bridge road to help give extra clearance to the taller trains.
This is the bridge I am planning to build for my module, it's based on a prototype on Elkton Rd in Virginia, and has a really interesting metal frame with wooden road surface. I will need to make my version slightly more extreme to clear the trains.
Subscribe to:
Posts (Atom)