Showing posts with label DPM. Show all posts

Friday, 27 January 2012

Structures for the freemo module


I spent some time working on the buildings for my module today, and both of the Rix bungalow kits are assembled and ready for painting.  I will be painting one of them blue and the other pale yellow, to add a touch of colour to the front of the module.


I've glued the roofs in place but kept the porches seperate for now to make painting easier.  A small section of evergreen profile styrene has been added to reinforce the porch when it is attached.


Both bungalows ready for painting.  The chimneys have been capped with leftover pieces of the plastic sections from the wall tops and I may add chimney pots from sections of styrene tubing.

The third building is another Rix kit 'Johns Place Corner Store'.  This kit is similar to a regular DPM building, but the quality of the moulding is much better and the kit fits together with less cleanup.

I added a plasticard step to the entrance where the pillar meets the ground, and filled the area above the porch to prevent light leaks.


I used squadron putty to fill the moulding holes along the back of the main side wall, then sanded smooth ready for painting.


Here is a shot of the main components after assembly, the roof is yet to be detailed, but I will be adding roof hatches, air vents and a chimney before I paint the building.


I plan to detail this building as a camera store, with suitable signage and detailing to serve any time period from the sixties up to the late eighties.


Friday, 20 January 2012

Wrong side of the tracks?


I took the bargain buildings I picked up at Benson to try them on my freemo module, specifically to test what the small town area would look like with more buildings.  I was only planning to use the DPM brick buildings on one side of the railroad crossing, with an open gravel area on the other.


Having tested the space with more buildings I'm now undecided, the street does look good with buildings on both sides, but having more symmetry on the board reduces the potential gains from flipping it around as there would be less variety.  If I stick with the current plan then the module should have more versatility.  Decisions decisions.


I also tested my Rix bungalow in position, this time with it's brick porch attached, the two houses are going to work well in position, and should give a nice 'Sears home' feel to the edge of the town.


There was a good turnout at the space tonight, and lots of work going on with the modules, including the first train running as my SD60M took a few trips back and forward along the station modules.  A landmark event, and good progress towards the goal of getting the entire circuit up and running.


Lots of work going on across all the modules, including the wiring for the station area and some discussion about the scenery for the outer sections of the city.


The wye crossing boards were also being fitted with connection bracing to connect them securely and allow track laying to begin properly.


Here is a short video of the first train running.  This is my SD60M running with a random collection of cars that were available around the club space.

Monday, 16 January 2012

Benson bits and pieces - bargains for the parts bin.

One of my favourite areas of any model railroad show is the secondhand sales tables, I'm always keen to pick up a bargain or a bag of bits for the parts bin and this weekends Benson NMRA meet was no exception.

The bring-and-buy tables were packed with all kinds of kits and bits, including a huge collection of 'O' gauge and a massive selection of Walther Amtrak coaches, along with the usual Athearn blue box and other assorted HO stock.

I picked up a number of cheap items that caught my eye, although all of them are very definitely going to be filed in the parts bin or added to the 'to do' list.


This Railpower SD60M (bizzarely painted in Warbonnet scheme) was a great deal at only £6, worth it for the trucks, plow and cables alone, I will probably strip the shell and rebuild it as a different roadname at some point.


This Dummy GP60 was only £3 and will make a good parts loco, or I may add a motor and sell it on.


A dash 9 shell minus one of it's fuel tank sides for 50p


Four DPM/Rix buildings for £9, these will clean up nicely to fill out my next freemo module.


A vintage Heljan/Con-Cor kit for a Ford C Auto Transporter.  All the parts seem to be there, including the transfers and instructions.  This was £3 but I'm already thinking that it might be too rare to build and perhaps would be best sold on to a collector instead.

There were several more items that caught my eye, including a number of Athearn blue box Railbox cars at £2 each, but I opted to save those for another day (i've got several on the to-do list already) and having reviewed the sheer number of projects waiting in boxes here in the house, I reckon I might need to do a bit of a spring clean and sell on some of the less likely projects before my next purchasing trip.

Friday, 13 January 2012

Like a bridge over troubled module...

I spent some time working on my freemo module over at the club space tonight.  I had three work-in-progress buildings with me to double check the spacing and layout of the town at one end.


I had laid out the building locations using paper templates, cut to measurements from the Walthers catalogue, and for the most part that seemed to have worked well.  The two rix bungalows turned out to need more space than I had allowed, mainly because I chose to use the version of the kit that includes a brick porch.

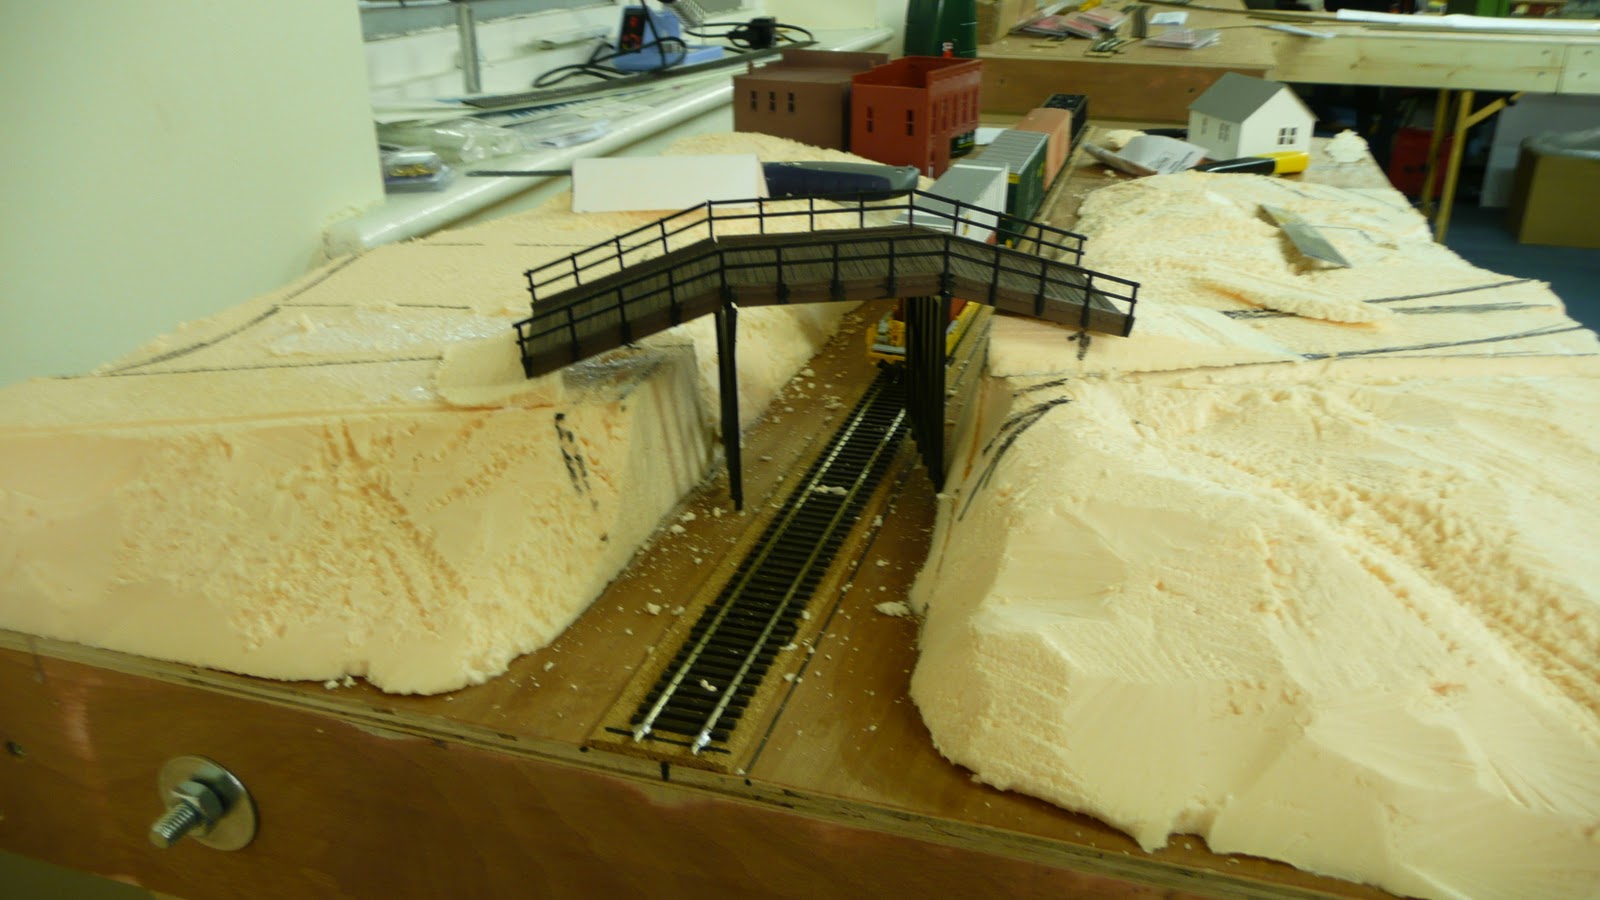
I realigned the road slightly at one end, and using a Rix wooden overpass kit that one of the other members has built for another module, I was able to previsualise the size and shape of bridge I will be adding to my module.


I had already added ramps to either side of the gap to build up the road surface to a more 'double stack friendly' height, but once I saw the Rix kit in place it was obvious that I didn't need as much space as I had thought, so I was able to remove one of the added pieces and replace it with a much smaller ramp.

I will be cutting back the edges of the embankments on either side of the bridge to give a shallower angled slope, which will make the trackside area much more realistic.  The bridge itself will be a scratchbuilt structure based on a Norfolk Southern prototype in Virginia.

Sunday, 1 January 2012

Building Project #1 - The roof goes on.

Following on from my earlier work on this project (see HERE for details) the DPM building kit project is taking shape.  I added the roof and chimney today, and created some extra edging pieces to add more percieved detail on the roof.


 The roof is positioned using sections of square profile plastruct to support the edges.  To begin with I had the roof set at a high angle but it didn't look right so I lowered it to match the angle of the lowest step on the side walls.


The roof piece is detailed with thin strips to suggest roof bracing, I will be painting the roof to simulate metal paneling with black paint to suggest tar sealent on the edges.


Two of the chimneys were removed to help give the building a more distinctive profile, I will be using it with several other DPM and Rix kits, so having different roofs will be important.


I used a razor saw to cut a groove around the chimney capstone, and then drilled out a hole for the chimney pots.  These were cut from plastruct tube.

I added strips of styrene to the top of each side wall, then sliced capstone gaps with a razor saw, this helps to give a more distinct top edge to the walls and will make it easier to paint the capstones.


A small piece of styrene fills out the gap above the store entrance, I am not adding any interior detail to the upper floors, the building will have printed window blinds and details on most of the windows so an interior will not be needed.


This shot shows the finished roof, there is still some clean-up and filler required along the back of the front wall where the kit has an indented moulding pip.  This shot also shows the chimney pots I added onto the two remaining chimneys.


The building is almost ready for painting, the final details will be added ahead of the primer step.

Thursday, 29 December 2011

Building Project #1 - Roberts Dry Goods

Today I started building my first structure kit in twenty years.  This is a Design Preservation Models kit #10200 - Roberts Dry Goods.

This is also my first time building a DPM kit, because when I was modelling US outline back in the late eighties there was nowhere in the UK to buy these kits from, I had to make do with enviously looking at the pictures and reviews in Model Railroader magazine.


I bought this kit from LSWR Penguin at a show a few months ago and it has been sitting on the 'to do' list ever since.  For a while I had it taped together and placed on my freemo baseboard to check the size of space I need for the town section on my board.  I will have five buildings in the completed town - a mixture of DPM and RIX kits.


The kit is moulded in large, simple sections with doors and windows as one-piece.  The components are plastic and the kit includes a piece of plasticard to make the roof and some clear plastic for glazing.


The kit has a fair amount of flash and moulding tabs that need to be cut off before assembly.


The window edges need to be carefully trimmed to remove flash otherwise the uneven edges will show up when the details are painted.


The edges of the walls are not square, so some sanding is required to make sure that everything joins together without gaps.  I have ordered a Northwest Short Lines 'True Sander' which will make this job easier, but in the meatime I used the edge of a wooden box as a makeshift square edge.  A few seconds of sanding and the walls are square enough to assemble.


I added strips of square profile evergreen styrene to reinforce the corner joints, and I used a metal square edge to keep everything straight while assemblinf the walls.


The kit goes together very quickly and after a short while the main structure is complete.  The outer walls meet with only a thin edge to show where the flat edge of the wall is glued together.  I expect some careful scribing will help to make the join invisible.


The final step is to assemble the three sections that make up the front entrance to the store.  These require a little extra sanding to make sure they are true, then they glue together as a sub-assembly before attaching to the front of the store.


With the walls completed, the next step will be to add the roof and prepare the building for painting.